
Rockville HTS45
5.1 Channel Home Theater System
Includes
- 5.25˝ Subwoofer with Built-in Amp/Receiver
- (2) Front Speakers with 12-Ft Cables
- (2) Rear Speakers with 30-Ft Cables
- (1) Center Channel Speaker with 12-Ft Cable
- Speaker Mounting Hardware
- Remote Control
- (3) Dual RCA to Dual RCA Cables
- FM Antenna Cable
- 1-Year Manufacturer's Warranty
Important Safety Instructions
To reduce the risk of electrical shock, do not remove amplifier plate. No user serviceable parts inside. We recommend taking the unit to a qualified service technician for any repairs.
Do not place these speakers on an unstable surface. The speaker may fall over, causing serious injury to a child or adult and serious damage to the unit.
Do not use these speakers near water; for example, near a bathtub, sink, in a wet basement, or near a swimming pool.
The speakers should be situated away from heat sources such as radiators, heat registers, stoves, or other devices that produce heat.
Clean only with a soft damp cloth. Unplug the main unit from the wall outlet before cleaning.
Connecting the Speakers
Place speakers in the desired position (see Positioning the Speakers section).
Using the attached cables, connect the center, front and satellite speakers to the corresponding Audio Output RCA plugs on the subwoofer unit as shown below.
Wired Audio Input Options
RCA Aux Audio Input: Use the RCA Auxiliary jacks to connect computers, cellphones, or any other external sound source with a 3.5mm output. You will need an RCA to 3.5mm Y cable (not included).
DVD Audio Input: Use these RCA jacks to input the sound signal from any 5.1 channel output enabled source such as a TV, Home Theater receivers, Digital set-top boxes, game consoles, DVD players, Blu-ray players, CD players, etc.
-
Coax/Optical Input: Use these inputs to connect a TV, Digital set-top boxes, Home Theater receivers, game consoles, DVD players, Blu-ray players, CD players, etc.
⚠️Adjust your TV’s Audio settings (if experiencing issues):- Set your TV's sound output to external speakers.
- Go into your TV's audio settings and make sure to deactivate Dolby, ATMOS, etc. and select PCM format.
Positioning the Speakers
- Sub: Most people place the subwoofer in the front of the room, near the sound input source, for ease of connection. But since bass frequencies are omnidirectional the subwoofer can be placed anywhere. Try placing it near a wall or a corner for increased bass.
- Center: The center channel speaker should be placed directly in front of the listening position, above or below the sound input source. If possible, tilt it as necessary to direct the sound to ear level.
- Front Left & Right: Mount the front speakers on the wall, directly to the left and right of the center channel speaker. Angle them towards the listening position. Preferably, the tweeters should be at ear level.
- Surround Left & Right: Mount the satellite speakers on the wall, slightly behind the listening position, about 1 to 2 feet above ear level or at ear level if height adjustment is not possible. If rear placement is not possible you can place them on the side facing towards the listener, or even forward slightly towards the listener if needed.
Wall Mounting
Before you begin please make sure you have the proper tools and necessary accessories. For this installation you will need the following items:
- Screws (included)
- Wall Brackets (5x included)
- Wall Hooks (optional, not included)
- Electric Drill
- Phillips Screw Driver
- Make sure you have all the necessary screws and brackets. There should be five brackets and one bag of screws. If any of these items are missing, please contact Rockville.
- If you are mounting the speakers horizontally, secure one bracket (two screws per bracket) to the back of each speaker you wish to mount. If you are mounting the speakers horizontally, you will need to use two brackets for each speaker.
- Now mark on the wall the place where you will be mounting your speakers. Use the diagram from the POSITIONING THE SPEAKERS section to determine the best location. Both front speakers should be at the same height; the same goes for the satellite units. Remember to keep speakers at least two feet away from corners, and make sure you have enough wire to reach the mounting location.
- You can use a screw or a mounting hook to hang the speaker. Use a screw with a drywall insert or drive it into a wall stud to ensure that it is securely fastened to the wall. Use a stud finder to locate the stud and to make sure that there are no wires or cable lines located in that area. Once the mounting hooks or screws are in place, you are ready to begin mounting. Be sure to wire each speaker before mounting it to the wall.
Functions
Front Panel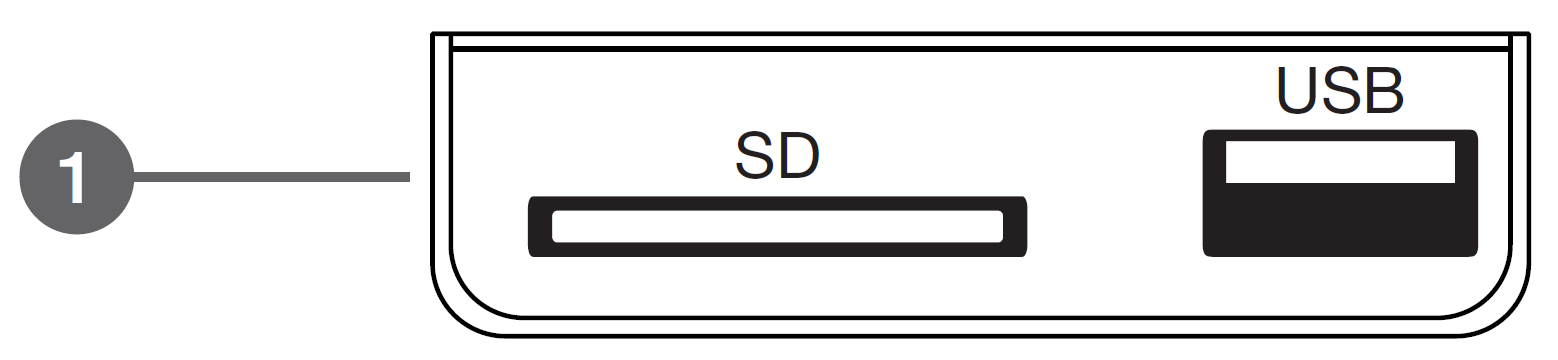
USB and SD ports (located on the top panel of the unit).
Input: Press and hold for 2 seconds to exit standby mode. Press to switch between AUX, SD, USB, Bluetooth, and FM modes.
|◀◀ / FM-: Press for previous track in USB, SD, and Bluetooth mode. In radio mode, press for previous station; press and hold to scan stations.
Master Volume: Turn the knob right or left to increase or decrease the system's volume. Press to adjust the volume of the front satellite speakers, rear satellite speakers, center channel speaker, and subwoofer independently.
1/4" MIC Inputs with Volume and Echo Control (located on the right side panel of the unit): Use these jacks to connect up to 2 wired microphones or wireless mic receivers for Karaoke.
▶||: In radio mode, press and hold for 2 seconds to automatically scan for and save available stations. In USB, SD and Bluetooth mode, press to start and pause playback.
▶▶| / FM+: Press for next track in USB, SD, and Bluetooth mode. In radio mode, press for next station; press and hold to scan stations.
LED Display: Displays current mode or input selected.
Rear Panel
Coaxial Input
- Optical Input
- Power Switch
- Power Cord
- Aux Stereo RCA Audio Input
- Front Left & Right RCA DVD Audio Inputs
- Rear Left & Right RCA DVD Audio Inputs
- Center RCA DVD Audio Input
- Subwoofer RCA DVD Audio Input
- Audio Outputs to Front Speakers
- Audio Outputs to Rear Speakers
- Audio Output to Center Speaker
- FM Antenna Port
Remote Control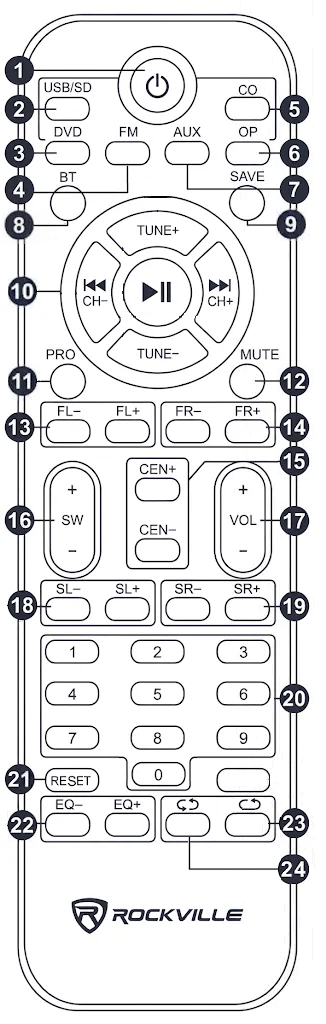
- Power Standby: Turn Standby mode on / off.
USB/SD: Select USB or SD input.
DVD: Select 5.1 DVD input.
FM: Activate FM Radio mode.
CO: Select Coaxial input.
OP: Select Optical input.
AUX: Select Auxiliary Stereo RCA input.
BT: Activate Bluetooth mode.
SAVE: Save stations to the unit’s memory.
-
~Audio Playback Controls~
TUNE+ & TUNE-: Manually tune FM stations.
▶||: Play / Pause in USB, SD and Bluetooth modes.
|◀◀ (CH-) & ▶▶| (CH+): Previous / Next FM station. Previous / Next track in USB or SD mode.
PRO: Switch between 5.1 (Surround) and 2.1 (Stereo) sound modes.
MUTE
- FL-/+: Front left speaker volume control
- FR-/+: Front right speaker volume control
- CEN+/-: Center speaker volume control
- SW+/-: Subwoofer volume control
- VOL+/-: Master volume control
- SL-/+: Surround (Rear) Left satellite speaker volume control
- SR-/+: Surround (Rear) Right satellite speaker volume control
- Number Pad: Used to directly select tracks in USB/SD mode.
RESET: Press to reset EQ to Standard. Press and hold for 3 seconds to reset volume.
EQ-/+: Adjust EQ settings in USB or SD mode.
Repeat 1: Repeat single track in USB or SD mode.
Repeat All: Repeat all tracks in album or folder (continuous loop).
Operation
Bluetooth
To connect your iPod, iPhone, MP3 player, Android phone, or any other Bluetooth-capable device, follow the steps listed below.
Make sure the unit is plugged in and the power switch is in the ON position.
Press the BT button on the remote control or push the INPUT button on the unit until "BT" appears on the digital readout.
Turn on the Bluetooth feature on your device and ensure that it is in "discoverable" mode. Search for "HTS45" on your list of available devices and select it.
Optical Input
To connect via Optical input, follow the steps listed below.
Make sure the unit is plugged in and the power switch is in the ON position.
Press the OP button on the remote control or push the INPUT button on the unit until "OP" appears on the digital readout.
Use a digital optical audio cable to connect the HTS45 to the sound source.
Set your TV's sound output to external speakers.
Please note: If you are having issues with sound output, go into your TV's audio settings and make sure to deactivate Dolby Pro-Logic, Dolby ATMOS, etc. and select PCM format.
FM Radio
For FM radio, follow the steps listed below.
Make sure the unit is plugged in and the power switch is in the ON position. Be sure to connect the included FM antenna.
Press the FM button on the remote control or push the INPUT button on the unit until the digital readout shows numbers.
-
To automatically save stations:
Press and hold the PLAY/PAUSE button for 3 seconds. The unit will begin to automatically search and save any available stations.
-
To manually save stations:
Use the TUNE +/TUNE - buttons to find a station you like and that is coming in clearly.
Press the SAVE button. CHAN will start flashing on the screen. Use the CH-/CH+ buttons to select the channel number you'd like to program for that station.
Use the CH-/CH+ buttons to navigate through saved stations or use the TUNE +/TUNE - buttons to manually find a station.
USB/SD
Use the USB and SD inputs to connect any USB flash drive or SD card with a max capacity of 16 GB.
Please note: Accepted file formats are MP3, WMA, APE, FLAC and WAV. Files must be properly formatted; simply changing the file extension to one of the specified formats will not work.
For USB/SD playback, follow the steps listed below.
Make sure the unit is plugged in and the power switch is in the ON position.
If you are in a different mode, press the USB/SD buttons on the remote control or push the INPUT button on the unit until the digital readout shows "USB" or "SD."
Plug in your SD card or USB flash drive. The unit will automatically begin playing music.
Mic Input
To use the system for karaoke, connect any microphone via either one of the 1/4" inputs located on the front of the unit. With microphone(s) connected, you can control the volume and echo settings by using the corresponding knobs.
Features
HTS45 800W 5.1 Channel Bluetooth Home Theater Audio System + Subwoofer
Plug and play system with everything you need right out of the box
800 Watts Peak Power
400 Watts Program Power
200 Watts Continuous RMS Power
5.25" Subwoofer with built-in receiver
1 x 3" Center Channel Speaker
2 x 3" Full-Range Front Channel Speakers
2 x 3" Full-Range Rear Channel Speakers
Top-quality MDF wood cabinets with plastic front panels
Built-in FM receiver with amazing reception
Digital display
5 Preset EQs: pop, jazz, rock, classical, country, and normal. Please note, the preset EQs are only accessible via the remote control.
You can independently control the volume of each speaker and the subwoofer
Bluetooth v5.0
Optical input
Coaxial input
USB input (max file size: 64GB)
SD input (max file size: 64GB)
Acceptable file formats: MP3, WMA, APE, FLAC, and WAV.
2 1/4" MIC inputs with volume and echo controls for karaoke
5 RCA Audio outputs
6 RCA DVD Audio inputs
2 RCA AUX inputs
FM antenna
Full function remote
Specifications
Cable Length: Front L/F: 12ft, Rear L/R: 30ft, Center: 12ft
Frequency Response: 30Hz - 20KHz
Amplifier: Class AB
Signal to noise ratio: ≥50dB
Max SPL: 106 dB @ 1w/1m
Input voltage: 120V/60Hz
Subwoofer Dimensions in Inches: (W*D*H) 6.69" x 13.58" x 12.20"
Center Speaker Dimensions in Inches: (W*D*H) 4.53" x 3.54" x 7.87"
Front L/R Satellite Speaker Dimensions in Inches: (W*D*H) 4.53" x 3.54" x 7.87"
Rear L/R Satellite Speaker Dimensions in Inches: (W*D*H) 4.53" x 3.54" x 7.87"
Troubleshooting
Problem |
Solution |
No power |
|
No sound |
|
No sound from mics |
|
Bluetooth pairing fails |
|
No SD or USB memory device playback |
|
Poor or no radio reception |
|
Comments
0 comments
Please sign in to leave a comment.