
Rockville Phenom RXA-Series
Class AB Multi-Channel Car Audio Amplifiers
Rockville Phenom RXH-Series
Class AB+D Hybrid Multi-Channel Car Audio Amplifiers
Important Safety Instructions
WARNING: BE AWARE! Use of this amplifier at extreme high volumes for extended periods of time may cause hearing loss and/or hearing damage. Your ability to hear necessary traffic sounds will be impaired. Always keep your sound volume at reasonable levels when operating your car.
- When installing the amplifier, secure it tightly. An unmounted amplifier in your car can cause serious injury to passengers and damage if it is set in motion by an abrupt maneuver or sudden stop.
- To reduce risk of electric shock, never open the unit. There are no serviceable parts.
- Please ensure that the unit is situated in a properly ventilated area.
Installation Basics
- Before you begin your installation, disconnect the NEGATIVE(-) terminal from your vehicle's battery. This safety precaution will avoid possible short circuits while wiring your amplifier.
- Rockville amplifiers operate on 12-volt negative ground systems only.
- It is recommended that you lay out your sound system design on paper first. This will help you during the installation so that you have a wiring flowchart and do not miss-wire any of your components.
Mounting the Amplifier
PHENOM amplifiers feature four mounting holes located in front of the end panels (refer to the illustration below). Never install an amplifier in the engine compartment or on the firewall.
- Mounting Instructions:
- Lay down the amplifier and mark the location of the mounting holes. It can be installed either horizontally or vertically.
- Remove the amplifier and drill pilot holes for the screws. Be sure to watch for your gas tank, gas lines, and electrical lines. Do not drill or mount any screws where they might penetrate the gas tank.
- Place the amplifier and secure it to the mounting surface using the supplied screws. Please be sure to leave breathing room around the amplifier heat sink so that it can efficiently dissipate the heat it produces.
- As connections can work loose due to vehicle vibrations during normal operation, we recommend periodically tightening all power and ground connections.
- Do not overtighten the screws.
Wiring
- Make sure to disconnect the NEGATIVE (-) terminal from your car's battery.
- Attach an 8-gauge or heavier wire to the amplifier screw terminal marked GND. The connection should be as close to the amp as possible (20 feet or less). Connect the ground wire to a metal part of the vehicle's chassis, making sure that there is no paint or other insulator blocking a good ground connection. When installing multiple amplifiers, mount them in close proximity so that they can all share the same ground point.
- Connect the remote terminal to the head unit's remote output using an 18-16 gauge or heavier wire. This connection is responsible for turning the amplifier on and off with the rest of the system. If there is no dedicated remote output, make this connection to the power antenna lead. Should your head unit not have any turn-on leads, you can wire the remote terminal to an accessory lead, which turns the amplifier on with your car's ignition. Please note: Do not connect the remote wire when using the high-level inputs.
- Use an 8-gauge or heavier wire to connect the screw terminal marked +12V to the battery's POSITIVE (+) terminal. In order to protect the battery and electrical systems of your car, add an in-line fuse holder within 18" of the battery. This in-line fuse offers protection against damage from short circuits. The power wire should terminate in a large ring terminal connected directly to the POSITIVE (+) terminal. An optional second fuse can be installed closer to the amplifier for additional protection to the amplifier itself. If installing multiple amplifiers, install a distribution block near their location and, using a 0-gauge wire, connect the block to the in-line holder that is connected to the battery.
- Insert fuse(s) into the in-line fuse holder(s) and check that all connections are properly secured.
- Before powering up the system, set all the amplifier's level controls to minimum, the crossover/setting switches to the desired position, and the head unit's volume to 75%.
We have received amplifiers back to our service department with melted power/ground terminals caused by a bad ground connection. When there is a lack of good ground, heat builds up at the contact screws of the amplifier terminal. Over time the heat generated will begin to melt the terminal. It is a good practice to feel the power and ground wires near the amplifier after using the amp for a while. If the wires feel hot to the touch, you probably have a bad or loose connection. If after adjusting your connections the wires still feel hot, you should upgrade to the next heaviest gauge wire. As connections can work loose due to vehicle vibrations, we recommend periodically tightening all power and ground connections.
If your Phenom amp has an external fuse, never replace it with one of a larger value. For model specific fuse ratings.
Do not connect when using high-level inputs.
Wire Terminals
For best performance be sure to strip your wire, at minimum, as per the diagram below.
| +12V Power and Ground | REM | Speaker |
|---|---|---|---|
Terminal Diameter: | 0.33in (8.5mm) | 0.15in (4mm) | 0.137in (3.5MM) |
Terminal Depth: | 0.66in (17mm) | 0.55in (14mm) | 0.55in (14mm) |
Setting Volume / Gain Levels
- Use a small flathead screwdriver to turn the controls.
⚠️ Do not apply any pressure while turning as this might break the control unit. - When setting up a multi-amp system, set each amplifier's level controls separately. Start off with the bass amplifier, then adjust the highs amplifier's level control to match.
- Please note that the level control of any car amplifier should not be mistaken for a volume control. It is a sophisticated device designed to match the output level of your source unit to the input level of the amplifier.
- Do not adjust the amplifier level to maximum unless your input level requires it. Your system can also be extremely sensitive to noise when the input level is set to maximum and does not match your input signal.
- These adjustments should need to be made only once when first setting up the system.
- Setting Input Levels:
- Once the system is operational, set all crossover points to the approximate settings within the frequency response range of your speakers or subwoofers (check manufacturer's spec). In the case of a basic subwoofer system, set the Low Pass crossover at 100Hz or so.
- Set the amplifier's Input Sensitivity using the control accessible on the side of the amplifier marked INPUT LEVEL (gain). Turn it counterclockwise to the MIN position.
- Set your head unit's output volume to about 75%-85% of the maximum and play music.
Please note: Any other amps connect to the head unit should be powered off. Any speakers connected directly to the head unit should be disconnected. Otherwise you may be pumping sound through speakers you do not want to. - Now turn the INPUT LEVEL control on the amp clockwise until you hear clipping or distortion, then turn it counterclockwise by a notch or until the distortion is gone. The amp's input sensitivity is now set. It can be helpful to have a second person to help you set the gain.
- Once you are satisfied with the level control settings, use any equalizer controls to adjust the system's tonal level for personal preference. Keep in mind that after equalizing you may have to go back and reset the amplifier's level controls.
If your unit has been professionally installed, please do not change the amp settings before contacting the installer. He or she is the professional!
Crossovers / Settings
2-Channel Amps
The RXA-T1 and RXA-T2 feature fully adjustable 12dB per octave low-pass, high-pass, and full-range electronic crossovers.
Crossover Settings:
- Coaxial or component speakers: Set the CROSSOVER switch to FULL (preferred) or HPF. Now the CROSSOVER FREQUENCY HIGH PASS control will adjust the high-pass frequencies between 15Hz and 250Hz.
- Low-Pass/Subwoofer systems: Set the CROSSOVER switch to LPF. Now the control marked CROSSOVER FREQUENCY LOW PASS will adjust the low-pass frequencies from 50Hz - 250Hz.
4-Channel Amps
The RXA-F1 and RXA-F2 feature a fully adjustable 12dB per octave full and high-pass electronic crossover for Channels 1-2. Channels 3-4 feature fully adjustable 12dB per octave low-pass (bandpass), high-pass, and full-range electronic crossover.
Crossover Settings:
- Coaxial or component speakers: Set the CROSSOVER switches to FULL (preferred) or HPF. Now the control marked HIGH PASS on Channel 1-2 will adjust the high-pass frequencies from 50Hz-300Hz or 500Hz - 3kHz, depending on the FREQUENCY MULTIPLIER setting (see page 13). The Channels 3-4 HIGH PASS control will adjust the high-pass frequencies between 15Hz - 1kHz.
- Low-Pass systems with one subwoofer bridged to Channels 3-4: set their CROSSOVER switch to LPF/BPF. The control marked LOW PASS will adjust the low-pass frequencies from 50Hz-3kHz.
- Low-Pass systems with 2 subwoofers (bridged to Channels 1-2 and 3-4 respectively): Set the Channel 1-2 CROSSOVER switch to CLONE CH3 & CH4 and set the Channel 3-4 CROSSOVER switch to LPF/BPF. Now all crossover and gain settings will be controlled from Channels 3-4. See page 12 for a more detailed explanation of the clone function.
Subsonic Filtering (Channels 3 and 4 only):
For subwoofer installations with a passive LP crossover, you can set the CROSSOVER selector to HPF while setting the HPF control from the lowest setting to 30Hz. This will act as a SUBSONIC FILTER for all signals below that setting. This is especially useful for vented enclosures where the port tuning frequency falls below the subwoofer tuning frequency to protect against subwoofer unloading. If there is no passive crossover, and it is a raw woofer, they can set the switch to LPF (BPF) and use the bandpass mode by setting the HPF to 30Hz and the LPF to 120Hz.
5-Channel Amp
The RXH-F5 features a fully adjustable 12dB per octave full and high-pass electronic crossover for Channels 1-2. Channels 3-4 feature fully adjustable 12dB per octave low-pass (bandpass), high-pass, and full-range electronic crossover.
Crossover Settings:
- Coaxial or component speakers: Set the CROSSOVER switches to FULL (preferred) or HPF. Now the control marked HIGH PASS on Channel 1-2 will adjust the high-pass frequencies from 50Hz-3kHz. The Channels 3-4 HIGH PASS control will adjust the frequencies between 15Hz - 1kHz.
- Low-Pass systems with one subwoofer wired to Channels 5: The control marked LOW PASS will adjust the low-pass frequencies from 50Hz-250Hz.
- Low-Pass systems with 2 subwoofers (one bridged to Channels 3-4 and one wired to Channel 5): Set the Channel 3-4 CROSSOVER switch to BAND PASS/LOW PASS. The control marked LOW PASS will adjust the low-pass frequencies from 50Hz - 3kHz. Channel 5's LOW PASS control will adjust the low-pass frequencies from 50Hz - 250Hz.
In addition to setting the crossovers, you can use the phase switch, the bass EQ, subsonic filtering, and the dash mounted bass control to further adjust the amp's bass output. For information concerning phase control, the bass EQ, and subsonic filtering, please see below. For use of the dash mounted bass control, see page 13.
Phase Shift Switch:
The Phase Shift control synchronizes the phase of your subwoofer output to that of the other speakers in the vehicle. The switch can be set to 0 or 180 degrees. Set it to 0 and listen to a track with some bass. Now set the switch to 180 degrees, listen to the same track, and see if the bass output improves or becomes worse. Set the switch to the setting that achieves the best results.
Subsonic Filter:
The subsonic filter is NOT a cutoff. It has a roll-off slope that will attenuate the frequency it is set to. Attenuation will increase as the frequencies get lower, meaning the power to the woofer decreases at the filtered frequencies, which reduces excursion and the potential for damage. Subsonic filters have steep slopes such as 3rd or 4th order (18 or 24dB/Oct) so they can be set as close to your half-octave frequency as possible, or 25Hz - 35Hz sealed, without losing power in the surrounding frequencies.
Audio Preamp Input
All PHENOM marine amplifiers feature RCA preamp inputs. Run RCA cables from your sound source to the amplifier inputs. We suggest you use high-quality, shielded RCA patch cords to help reduce and eliminate unwanted electrical noise to your system. Use good quality RCA interconnect cables. Cheaper cables usually have poor shielding that can cause interference pickup.
⚠️ Be sure to run the RCA cables on the side of the vessel opposite to the side used to carry the power and ground leads of the amplifier.
Input Configurations
RXA-T1 and RXA-T2
2-Channel Amplifier:
If your head unit has only one pair of Left and Right RCA outputs, connect the Left output to the amplifier's Channel 1 input and the Right output to the Channel 2 input. All PHENOM 2- and 4-channel amplifiers feature RCA preamp line outputs for feeding a full-range signal to a secondary full-range amplifier in a multi-amp system.
RXA-F1 and RXA-F2
4-Channel Amplifier in 2-Channel Mode:
If your head unit has only one pair of Left and Right RCA outputs, connect the Left output to the amplifier's Channel 1 input and the Right output to the Channel 2 input. Be sure to set the amplifier's input mode switch to 2CH. The amplifier preamp circuit will automatically mix the signals to Channels 3-4 thereby preserving your Left and Right Balance control but with no Fade control Front to Rear.
4-Channel Amplifier in 4-Channel Mode:
If your head unit has two pairs of Left and Right RCA outputs, connect the Front Left output to the amplifier's Channel 1 input and the Front Right output to the Channel 2 input. Connect the Rear Left output to the amplifier's Channel 3 input and the Rear Right output to the Channel 4 input. Be sure to set the amplifier's input mode switch to 4CH. The preamp circuitry will not mix any signals thereby preserving full Left to Right Balance and Front to Rear fader control.
RXH-F5
5-Channel Amplifier in 2-Channel Mode:
If your head unit has only one pair of Left and Right RCA outputs, connect the Left output to the amplifier's Channel 1 input and the Right output to the Channel 2 input. Be sure to set the amplifier's input mode switch to 2CH. The amplifier preamp circuit will automatically mix the signals to Channels 3-4 thereby preserving your Left and Right Balance control but with no Fade control Front to Rear.
5-Channel Amplifier in 4-Channel Mode: If your head unit has two pairs of Left and Right RCA outputs, connect the Front Left output to the amplifier's Channel 1 input and the Front Right output to the Channel 2 input. Connect the Rear Left output to the amplifier's Channel 3 input and the Rear Right output to the Channel 4 input. Be sure to set the amplifier's input mode switch to 4CH. The preamp circuitry will not mix any signals thereby preserving full Left to Right Balance, Front to Rear fader control.
5-Channel Amplifier in 5-Channel Mode:
If your head unit has three pairs of RCA outputs, input Front Left and Front Right into amplifier Channels 1-2 input jacks. Rear Left and Rear Right into amplifiers Channels 3-4 input jacks. Subwoofer output into channel 5. If your head unit has only a single subwoofer output, use a Y adaptor to feed both channel 5 inputs. Set the Input Mode Switch to 5CH. The amplifier's preamp circuitry will automatically mix all the channels and output will occur on all 5 channels. There will be Left and Right balance, Front to Rear fader with independent subwoofer.
High Level Inputs
Many factory radios do not have preamp outputs; thus, all Phenom 2-, 4-, and 5-channel amps feature High Level inputs. Also referred to as Speaker Level inputs, High Level inputs allow you to connect to the factory speaker wires. They are called High Level inputs because they convert the high voltage running through factory speaker wires to one the amplifier can handle. These inputs will provide the end user with clean, well-defined sound for optimal musical enjoyment.
PLEASE NOTE: The High Level inputs also feature Auto-Start Smart Turn-On. This function senses when there is a signal from the head unit and automatically turns on the amplifier; hence, no need to run a Remote Turn-On wire.
WARNING: Do not use high level and low level inputs at the same time.
⚠️ When using high level inputs, do not connect anything to the amplifier's remote terminal block.
RXA-T1
RXA-F1, RXA-F2 and RXH-F5
Clone Function
The Phenom RXA-F1 and RXA-F2 feature a unique Clone Function to assist in setting up a 2-channel bridged system with perfect gain and crossover tracking between the speakers. Typically when setting up a system you would need to setup the crossovers and gains of Channels 1-2 and Channels 3-4 separately, not guaranteeing perfect balance or frequency cutoffs. By using the Clone Function you can control Channels 1-2 from the processed signals of Channels 3-4 thereby guaranteeing that all 4 channels are getting identical voltages and have their crossover settings at identical frequencies. Here is how you do it:
Connect your head unit's Left RCA outputs to the amplifier's Channel 3 input and the Right RCA outputs to the Channel 4 input.
Set the Crossover mode switch to CLONE CH3 & CH4. This will send the processed signal of Channels 3-4 to Channels 1-2.
Now all controls for Channels 1-2 will be non functional. All crossover and gain settings will be controlled from Channels 3-4.
Frequency Multiplier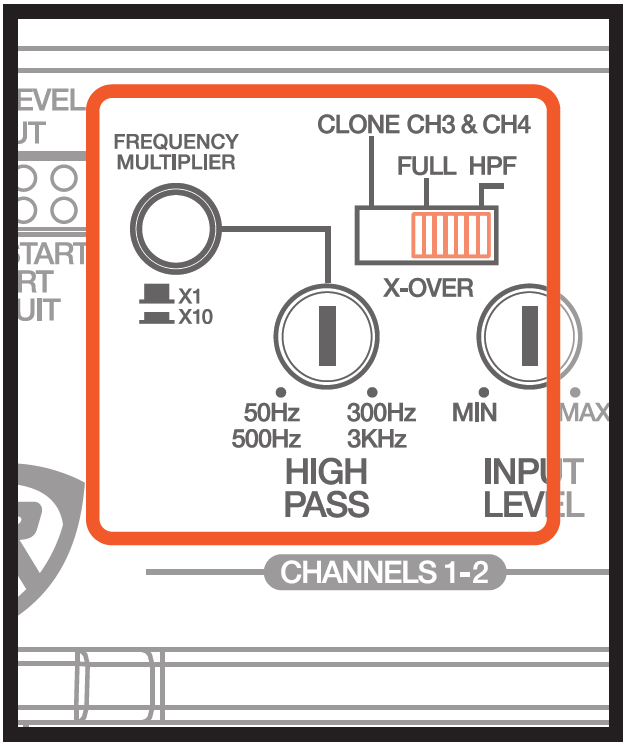
The RXA-F1 and RXA-F2 feature a x10 frequency multiplier button. To adjust high pass frequencies between 50Hz – 300Hz, depress the button and use the HIGH PASS control to make adjustments. To adjust high pass frequencies between 500Hz – 3kHz, press the button, then use the HIGH PASS control to make adjustments.
Band Pass Function
The Phenom RXA-F1 and RXA-F2 feature a BANDPASS FUNCTION. In the LPF/BPF position the High Pass and Low Pass frequency controls work together creating a band pass channel optimized for midrange playback. The RXH-F5 also features the same function for Channels 3-4.
Bass Remote
The RXH-F5's dash-mounted bass remote allows you to control the amplifier's bass level from the comfort of the driver's seat. Use the included 6-pin RJ12 cable to connect one end to the RJ12 jack on the amp and the other to the RJ12 jack on the rear of the remote. Use the included screws to mount the remote.
Preamp Line Outputs
PHENOM 2- and 4-channel amplifiers feature RCA preamp line outputs for feeding a full-range signal to a secondary full-range amplifier in a multi-amp system.
RXA-T1 2-Channel Amplifier
Please note: This output will be affected by the amplifier's Crossover settings.
RXA-F1 and RXA-F2 4-Channel Amplifiers
Please note: This output will be affected by the amplifier's Crossover settings.
Output Configurations
RXA-T1
2-Channel Amp Speaker Wiring:
Install any two or four speakers being careful not to load either channel below 2-ohm stereo. For typical 6" x 9" or 6.5" speaker installs, set the Crossover switch to FULL (Full Range) or HPF. If you are using a system with a sub, we recommend setting the Crossover switch to LPF.
2-Channel Amp Subwoofer Wiring:
Install any subwoofer being careful not to load the amp below 4-ohm bridged. Set the Crossover switch to LPF.
RXA-F1 and RXA-F2
4-Channel Amp ~ Four-Speaker Wiring:
Install any combination of component or coaxial speakers independently on Channels 1-4, being careful not to load any single channel below 2-ohm stereo. For typical 6" x 9" or 6.5" or component or coaxial speaker installs, set the Crossover switches to FULL or HPF. You can also use the Clone Function (see section below) for this setup.
4-Channel Amp ~ Two-Speaker and One Subwoofer (3-Channel System) Wiring:
Channels 1-2 should be wired to component or coaxial speakers with no lower than 2-ohm load per channel in stereo. Channels 3-4 should be bridged as per the diagram wiring the woofer to Channel 3's positive (+) terminal and Channel 4's negative (-) terminal. The Channels 1-2 Crossover switch should be set to FULL, while the Channels 3-4 Crossover switch should be set to LPF/BPF.
- Two stereo speakers connected to CH1 and CH2 terminals (2-ohm minimum impedance) and one subwoofer bridged across CH3 and CH4 terminals (4-ohm minimum impedance) with CH1-2 crossover set to FULL and CH3-4 crossover set to LPF/BPF
4-Channel Amp ~ Dual Subwoofers Using the Clone Function:
Channels 1-2 and Channels 3-4 should be bridged as per the diagram. Wire one woofer to Channel 1's positive (+) terminal and Channel 2's negative (-) terminal. Wire one woofer to Channel 3's positive (+) terminal and Channel 4's negative (-) terminal. Set the Channel 1-2 Crossover switch to CLONE CH3 & CH4. Set the Channel 3-4 Crossover switch to LPF/BPF. All crossover and gain settings will be controlled from Channels 3-4.
RXH-F5
5-Channel Amp ~ Four Speakers and Single Sub:
Install any combination of component or coaxial speakers independently on Channels 1-4, being careful not to load any single channel below 2-ohm stereo. For typical 6" x 9" or 6.5" or component or coaxial speaker installs, set the Crossover switches to FULL. Channel 5 should be wired to a subwoofer with a minimum impedance of 2 ohm. Set the Crossover switches of Channels 1-2 and Channels 3-4 to FULL.
5-Channel Amp ~ Four Speakers and Dual Subs:
Channels 1-2 should be wired, in parallel, to speakers with no lower than 2-ohm load (minimum 4-ohm rated speaker) per channel in stereo. Channels 3-4 should be wired (bridged) to a subwoofer with a minimum impedance of 4 ohms. Channel 5 should be wired to a subwoofer with a minimum impedance of 2 ohm. Set the Channels 1-2 Crossover switch to FULL. Set the Channels 3-4 Crossover switch to BAND PASS/LOW PASS.
Subwoofer Wiring Guide
The minimum impedance load for a single PHENOM Series Class AB amp is 2-ohm stereo/4-ohm mono bridged. Lower impedance loads will cause overheating and may damage the amp. Do not mix different impedance speakers in series and/or parallel combinations, as unequal power sharing and acoustic outputs will result.
⚠️ Do not mix different impedance speakers in series and/or parallel combinations, as unequal power sharing and acoustic outputs will result.
SVC (Single Voice Coil) Woofer Configurations
DVC (Dual Voice Coil) Woofer Configurations
Features
Bass Equalization Circuitry (Bass EQ)
A narrow "Q" peaking equalization circuit is included in the amplifiers. The equalization system is preset at 45Hz. The Bass EQ switch has three positions: 0dB, 6dB, 12dB and allows you to boost low-end frequencies in order to tailor the bass response to your system's needs. This switch should be left in the 0dB (off) position. Improper use of the bass eq can damage your system. Make sure your speakers can handle the extra power output! It would be foolish to add 12dB of gain to low excursion 8" and 10" subwoofers or midranges and tweeters. It's a sure way to blow your speakers.
Audio Output Section
The audio output section of PHENOM Series Class AB amplifiers feature studio grade, high current Bi-Polar audio transistors. They are cleaner and have lower distortion, are higher current capable and more reliable.
Active Dynamic Regulation
Phenom Series amplifiers feature our proprietary ADR, Active Dynamic Regulated power supplies. 100% HexFET devices are utilized in the power supply for high speed (100kHz) switching frequencies. The power supplies are capable of supplying the main amplifier with a considerable amount of reserve voltage for peak "high demand" situations. The ADR circuit provides full bandwidth power for authoritative bass response, high current output into low impedance loads and increased headroom. The ADR is supplied with power via a high speed, high temperature capacitance bank and 100% pure copper rails on the PCB enabling fast transient response to musical demands.
Power and Protection Circuitry
These amplifiers feature our unique IC-controlled protection circuitry. This sophisticated circuit constantly monitors the heat sink internal temperature and various voltages, adjusting the amp automatically and protecting it from dangerous conditions. They feature an LED located on the side of the amplifier that provides indication of the amplifier's status. The LED will be green when the amplifier is receiving proper power, ground, and remote voltages; and the IC-monitoring sequence indicates the amp is functional. In case the amplifier encounters a diagnostic condition as listed below, the LED will be red indicating a diagnostic condition. When a diagnostic condition is sensed, the amplifier will then go into self-preservation mode and if the cause of the diagnostic condition is not corrected, it will eventually shut down. There are certain critical diagnostic conditions that will turn the amplifier off immediately.
Thermal Protection: When the amplifier reaches an unsafe operating temperature of 80 degrees Celsius, the amplifier will turn off. Once the amplifier cools down to a safe temperature, it will automatically turn on again. If you live in a hot climate, we suggest installing additional cooling fans in the installation area to exhaust the hot air which can build up. This will help keep the ambient temperature in the installation area as low as possible so that your amps work flawlessly and without any musical interruption.
Speaker Short Circuit Protection: Should your speakers short circuit due to voice coil burn out, or should the amplifier sense an impedance too low to handle, the protection LED will light, indicating a diagnostic condition. Turn off your system, disconnect one speaker at a time, and try to determine that speaker might be faulty. Correct the condition and restart the amplifier. You must reset the amplifier by turning it OFF and then ON again by the Remote power connection after correcting a diagnostic condition. (Turn your radio off and then on again.)
Input Overload Protection: This circuit will either shutdown the amplifier completely or make the amplifier spurt on and off indicating that it is in a diagnostic condition. Turn the system off and reduce the gain on the amplifier or volume from your head unit. This should result in a corrected condition.
DC Offset Protection: Should any DC voltage try to enter the amplifier via the speaker terminals it will cause the amplifier to shut down and not operate until this condition is remedied. This circuit will also protect damaging high DC voltages from reaching your speakers should your amplifier ever malfunction.
PLEASE NOTE: You must reset the amplifier by turning it OFF and then ON again after correcting a diagnostic condition (turn your radio off and then on again). If the amplifier stays in protection after a reset, it is most likely faulty.
Mute Circuit
This is an anti-thump, mute and delay circuit that eliminates irritating, speaker-damaging turn-on and turn-off transients normally experienced with less expensive amplifiers.
Battery Voltage
Rockville Phenom Series amplifiers are rated and regulated to 13.8 volts and below. Increasing voltage to 16 volts will increase the power output of the amplifier in the same proportion. Maximum input voltage is 16 volts while the minimum voltage is 10 volts.
Do Not Exceed 16V Input Voltage
Though capable of high power reproduction, Phenom Series amplifiers are not competition style amplifiers! They were designed for audiophile sound reproduction.
Additional Features
RXA-T1 / RXA-T2
- High-Speed MOSFET Power Supply
- Studio-Grade Bipolar Output Stage Transistors
- Fully Adjustable 12dB/Octave Crossover w/Differential Circuitry
- Low Pass 50Hz – 250Hz
- High Pass 15Hz – 250Hz
- Fully Adjustable 12dB Bass Equalizer
- 2-Ohm Stable Stereo
- 4-Ohm Mono Bridgeable
- Mute and Delay Soft Start System
- High Level Input with Auto Start Smart Turn-On
- Full IC-Controlled Protection Circuitry
- RCA Preamp Line Output
- ELNA Brand Audiophile Capacitors
- Status Mode LED Indicator
- 8 Volt Preamp Circuitry
RXA-F1 / RXA-F2
- High-Speed MOSFET Power Supply
- Studio-Grade Bipolar Output Stage Transistors
- Fully Adjustable 12dB/Octave Crossover w/Differential Circuitry
- CH3 & CH4 Low Pass 50Hz – 3kHz
- CH3 & CH4 High Pass 15Hz – 1kHz
- CH1 & CH2 High Pass 50Hz – 300Hz, 500Hz – 3kHz (x10)
- Fully Adjustable 12dB Bass Equalizer
- 2-Ohm Stable Stereo
- 4-Ohm Mono Bridgeable
- 3-Channel Mixed mono capable
- 2CH/4CH Input Mode Switch
- Mute and Delay Soft Start System
- High Level Input with Auto Start Smart Turn-On
- Full IC-Controlled Protection Circuitry
- RCA Preamp Line Output
- ELNA Brand Audiophile Capacitors
- Status Mode LED Indicator
- 8 Volt Preamp Circuitry
RXH-F5
- Channels 1-4 are class A/B and channel 5 is mono class "D"
- High-Speed MOSFET Power Supply
- Studio-Grade Bipolar Output Stage Transistors
- Fully Adjustable 12dB/Octave Crossover w/Differential Circuitry
- CH3 & CH4 Low Pass 50Hz – 3kHz
- CH3 & CH4 High Pass 50Hz – 1kHz
- CH5 Low Pass 50Hz – 250Hz
- CH1 & CH2 High Pass 50Hz – 3kHz
- Fully Adjustable 12dB Bass Equalizer
- 2-Ohm Stable Stereo
- 4-Ohm Mono Bridgeable
- 3-Channel Mixed mono capable
- Channel 5 is 2 Ohm mono capable
- 2CH/4CH/5CH Input Mode Switch
- Fully Adjustable Subsonic Filter: 15Hz – 55Hz
- Mute and Delay Soft Start System
- High Level Input with Auto Start Smart Turn-On
- Full IC-Controlled Protection Circuitry
- Remote Dashboard Subwoofer Control
- ELNA Brand Audiophile Capacitors
- Status Mode LED Indicator
- 8 Volt Preamp Circuitry
Specifications
RXA-T1
- Dyno Certified RMS Power Output:
- 2 Ohm: 370 Watts (185 Watts x 2 Channels) <1% THD+N
- 4 Ohm: 250 Watts (125 Watts x 2 Channels) <1% THD+N
- 4 Ohm Bridged: 370 Watts x 1 Channel
- Peak Power Output: 1500 Watts (2 x 750 Watts @ 2 ohms or 1 x 1500 Watts @ 4 ohms bridged)
- Minimum THD at Rated Power: <0.05%
- Frequency Response: 10Hz – 40kHz
- S/N Ratio: 100dB
- Damping Factor: >200 @ 100Hz
- 50 Amp Maxi Fuse
- Dimensions: (W x H x L) 8.6" x 1.8" x 13"
RXA-T2
- Dyno Certified RMS Power Output:
- 2 Ohm: 600 Watts (300 Watts x 2 Channels) <1% THD+N
- 4 Ohm: 400 Watts (200 Watts x 2 Channels) <1% THD+N
- 4 Ohm Bridged: 600 Watts x 1 Channel
- Peak Power Output: 2400 Watts (2 x 1200 Watts @ 2 ohms or 1 x 2400 Watts @ 4 ohms bridged)
- Minimum THD at Rated Power: <0.05%
- Frequency Response: 10Hz – 40kHz
- S/N Ratio: 100dB
- Damping Factor: >200 @ 100Hz
- Dual 40 Amp Maxi Fuse
- Dimensions: (W x H x L) 8.6" x 2" x 13"
RXA-F1
- Dyno Certified RMS Power Output:
- 2 Ohm: 380 Watts (95 Watts x 4 Channels) <1% THD+N
- 4 Ohm: 260 Watts (65 Watts x 4 Channels) <1% THD+N
- 4 Ohm Bridged: 200 Watts x 2 Channel
- Peak Power Output: 1600 Watts (2 x 800 Watts @ 2 ohms or 1 x 1600 Watts @ 4 ohms bridged)
- Minimum THD at Rated Power: <0.05%
- Frequency Response: 10Hz – 40kHz
- S/N Ratio: 100dB
- Damping Factor: >200 @ 100Hz
- 60 Amp Maxi Fuse
- Dimensions: (W x H x L) 8.6" x 1.8" x 13"
RXA-F2
- Dyno Certified RMS Power Output:
- 2 Ohm: 600 Watts (150 Watts x 4 Channels) <1% THD+N
- 4 Ohm: 400 Watts (100 Watts x 4 Channels) <1% THD+N
- 4 Ohm Bridged: 600 (300 Watts x 2 Channel)
- Peak Power Output: 2400 Watts (2 x 1200 Watts @ 2 ohms or 1 x 2400 Watts @ 4 ohms)
- Minimum THD at Rated Power: <0.05%
- Frequency Response: 10Hz – 40kHz
- S/N Ratio: 100dB
- Damping Factor: >200 @ 100Hz
- Dual 40 Amp Maxi Fuse
- Dimensions: (W x H x L) 8.65" x 2" x 16.1"
RXH-F5
- RMS Power Ratings:
- 2 Ohm: 800 Watts (75 Watts x 4 Channels + 500 Watts x 1 Channel) <1% THD+N
- 4 Ohm: 550 Watts (50 Watts x 4 Channels + 350 Watts x 1 Channel) <1% THD+N
- 4 Ohm Bridged: 370 Watts x 1 Channel
- Minimum THD at Rated Power: <0.05%
- Frequency Response: 10Hz – 40kHz
- S/N Ratio: 100dB
- Damping Factor: >200 @ 100Hz
- Dual 60 Amp Maxi Fuse
- Dimensions: (W x H x L) 8.6" x 2" x 16.1"
Troubleshooting
Problem | Cause/Solution |
Amp goes into protect mode |
|
Amp won't power on |
|
Power but no sound |
|
Amp is clipping |
|
Distortion, background noise, crackling, or hissing in the speakers |
|
Sound is too low |
|
Amp keeps blowing fuses |
|
Amp gets very hot |
|
Amp or powered sub does not turn off when you turn off the vehicle |
|
One channel on the amp isn't working |
|
Comments
0 comments
Please sign in to leave a comment.