
Rockville ROCKFORCE 384
384 Channel DMX Light/Fog Controller with MIDI Control
The ROCKFORCE 384 is a universal DMX Controller with 384 DMX channels. This controller is designed to work seamlessly with lights from the leading brands. Our DMX controller is top quality and includes easy to understand instructions. This controller functions the same as controllers that other leading brands have made over the years.
With the ROCKFORCE 384 you can control 24 lights with up to 16 channels per light. In addition there is a 4 bit LED display and built in microphone which can be used to set up automatic modes. A great function we would like to mention is that you can take the program from any light and easily assign it to another light. This added feature provides flexibility and will saves you a ton of time at your next gig!
Although this controller has complex features we were able to design it with users of all experience levels in mind. Please read this guide carefully for proper use of your Rockville ROCKFORCE 384.
Important Safety Instructions
- To reduce risk of electric shock, never open the unit. There are no user serviceable parts, refer service to the Rockville service center.
Functions
Front Panel
- Channel Faders: For adjusting DMX values. Channels 1 - 16 can be adjusted immediately after pressing the respective scanner select button.
- Scanner PAGE SELECT Button: In manual mode, press to toggle between scanner pages (levels): 1-12 / 13-24.
- Mode LED Indicators: Provide operating mode status (Blackout, Step, Program, Music trigger, and Auto trigger).
- LED Display: Shows the active scene and bank number, current chase and step number, fader level settings, and shows the status for various other functions. When adjusting faders the display shows the current level setting. You can select how the level settings are shown (0-255 or 0% - 100%) by pushing TAPSYNC/DISPLAY (item 8).
- SPEED Fader: Will adjust the speed of scenes or a step within a chase. The display will show the setting in seconds.
- FADE TIME Fader: Adjusts the fade time for scenes and chases. The display will show the setting in seconds.
- BLACKOUT Button: Disables all DMX channel output and turns blackout mode on/off.
- TAPSYNC/DISPLAY:
- TAPSYNC: Controls the speed of scenes or chases. Press the button at the rate you want the chase or scenes to run at. This is as an alternative to using the SPEED fader. The display will show the result in seconds.
- DISPLAY: Switches the display between STEP and BANK. In other modes it switches the output level display to show 0-255 or 0% - 100%.
- CHASE Selector Buttons: Selects a chase for programming or playback.
- MUSIC/BANK COPY Button:
- MUSIC: Turns on Music Auto-Run. An internal microphone is used to synchronize chases or scenes to music. There is an indicator on the display showing when music trigger mode is active.
- BANK: In program mode pushing this button will copy the contents of one scene bank to another bank.
- AUTO/DEL Button:
- Auto: Activates Auto-Run triggering for chases or scenes. The display has an LED indicator that shows when Auto-Mode is active.
- Delete: In program mode this button will delete scenes, complete banks of scenes, chase steps, or complete chases.
- MIDI/ADD Button:
- MIDI: Turns MIDI mode on/off and selects the MIDI address.
- Add: In program mode pushing the MIDI/ADD button will record a chase step or scene setting.
- PROGRAM Button: Used to place the unit in programming mode to create/record scenes and chases. Press and hold for 3 seconds to turn programming mode on/off. An indicator on the display shows when program mode is active. The unit will go into blackout mode when exiting program mode. Push the blackout button to turn it off.
- BANK UP/BANK DOWN Buttons: Selects a scene bank. The third and fourth digits on the display show the currently active bank number (01 - 30). Also used for some chase programming operations.
- SCENES Selector Buttons: These buttons allow you to select a scene in the scene bank for programming or playback. The current scene is shown on the display.
- SCANNERS (Fixture) Selector: Used to select one or more of the 24 fixtures. Each one is a block of 16 DMX channels. These selectors are used in programming mode and manual mode.
Rear Panel
- MIDI IN: For external triggering of banks and chases using a MIDI device.
- DMX OUT: Outputs main control signal to fixtures and other DMX devices.
- DC Input Connector: Plug in the external power supply here. DC 9V - 12V, 300mA minimum.
- USB Lamp Socket: Plug in any standard USB-A powered LED light.
- Power Switch: Turns the unit on/off and can be used with other buttons to erase scenes and chases.
Fixture Channel Assignments
The controller is programmed to control 16 channels of DMX per fixture, therefore the fixtures you wish to control with the corresponding SCANNER buttons (Front Panel: item 16) on the unit, must be spaced 16 channels apart.
Scanner / Fixture | DMX Address | Scanner / Fixture | DMX Address | |
|---|---|---|---|---|
1 | 1 | 13 | 193 | |
2 | 17 | 14 | 209 | |
3 | 33 | 15 | 225 | |
4 | 49 | 16 | 241 | |
5 | 65 | 17 | 257 | |
6 | 81 | 18 | 273 | |
7 | 97 | 19 | 289 | |
8 | 113 | 20 | 305 | |
9 | 129 | 21 | 321 | |
10 | 145 | 22 | 337 | |
11 | 161 | 23 | 353 | |
12 | 177 | 24 | 369 |
Fixture Functions
You will need to know which channel within a fixture is assigned to each fixture function (pan, tilt, color, dimming, etc.). This information is normally given in the fixture's owner's manual.
Operating Fixtures Manually
To manually control a fixture push the corresponding fixture button in the Scanners section. This will activate the LED indicator and enable the channel faders (Front Panel: item 1). If you are using a fixture with more than 8 channels, press the PAGE A/B button to access the other channels. Multiple fixtures can be selected and controlled together. To de-select a fixture, press the corresponding button.
Pan and Tilt Channels
Because not all intelligent lighting fixtures are alike or share the same control attributes, the controller allows the user to assign the wheel the correct pan and tilt channel for every individual fixture. All pan/tilt settings can be reassigned to output on a different DMX channel.
- Press the desired CHASE button (Front Panel: item 9), then press PROGRAM (Front Panel: item 13) and TAPSYNC/DISPLAY (Front Panel: item 8) buttons to choose a DMX channel.
- Press a SCANNER button (Front Panel: item 16) that represents the fixture whose channel faders (Front Panel: item 1) you would like to reassign; using the SCAN PAGE SELECT button (Front Panel: item 2) as needed to access.
- Move one of the channel faders to select the pan channel.
- Press the TAPSYNC/DISPLAY button to select pan/tilt.
- Move one of the channel faders to select the tilt channel.
- Press and hold PROGRAM and TAPSYNC/DISPLAY buttons to exit and save settings.
- All LEDs will blink indicating completion of the operation.
⚠️To delete the channel assignments, press AUTO/DEL button (Front Panel: item 11).
Assigning Fade Time
You can choose the board's fade time during scene execution is implemented broadly to all output channels or only to the pan/tilt movement channels. This is relevant because often you will want gobos and colors to change quickly while not affecting the movement of the light.
- Turn off the unit.
- Hold the BLACKOUT (Front Panel: item 7) and TAPSYNC/DISPLAY (Front Panel: item 8) buttons....
- Turn on the unit.
- Press the TAPSYNC/DISPLAY button to toggle between:
- All Channels
- Pan/Tilt Only
- Press BLACKOUT and TAPSYNC/DISPLAY buttons to save settings.
- All LEDs will blink indicating completion of the operation.
Resetting the System
To reset the controller to its factory defaults follow the steps below:
- Turn off the unit.
- While holding the AUTO/DEL (Front Panel: item 11) and BANK UP (Front Panel: item 14) buttons...
- Turn on the unit.
Operating Fixtures Manually
- To manually control a fixture push the corresponding fixture /scanner button in the SCANNERS section (Front Panel: item 16).
- This will activate the LED indicator and enable the channel faders.
- The faders can be used to control the light(s) assigned to the scanner(s) selected.
- Check the owner's manual / available support material for the light(s) being controlled to see what each DMX channel controls.
Programming Scenes
There are a total of 30 scene banks, each containing 8 scenes which are programmable. Only one bank may be selected at any time. Program Mode is used for all scene record, edit, delete and copy functions.
- Activate Program Mode: Press and hold PROGRAM button (Front Panel: item 13) for 3 seconds
- The display PROGRAM indicator will continuously flash while in program mode.
Recording a Scene
- Position the SPEED (Front Panel: item 5) and FADE TIME (Front Panel: item 6) Faders all the way down.
- Select the SCANNERS (Front Panel: item 16) you wish to include in your scene.
- Adjust the appropriate faders to set the desired output level for each channel (Front Panel: item 1).
- Press MIDI/ADD button (Front Panel: item 12).
- Choose a BANK, 01 - 30, to change (if necessary).
- Select a SCENES button (Front Panel: item 15) to store. The LED display will flash indicating the scene was successfully stored.
- Repeat steps 3-7 to record other scenes. You can record up to 8 scenes in a program.
- Exit program mode by pressing and holding down PROGRAM for 3 seconds. After exiting the unit will remain in blackout mode. This will be indicated on the LED screen by the flashing dot at the top left corner next to BLACKOUT. Press the BLACKOUT button (Front Panel: item 7) to exit blackout mode.
Running a Scene
- Use the BANK UP/BANK DOWN buttons (Front Panel: item 14) to change program banks if necessary.
- Press the AUTO/DEL button (Front Panel: item 11) until the AUTO LED is on.
- Adjust the PROGRAM speed via the SPEED Fader (Front Panel: item 5) and the loop rate via the FADE TIME fader (Front Panel: item 6).
- Adjust the chase speed by tapping the TAPSYNC/DISPLAY button twice at a specific rate (Front Panel: item 8). The time between the two taps will determine the chase speed. The maximum time is 10 minutes.
Edit a Scene
- Use BANK UP/BANK DOWN buttons (Front Panel: item 14) to change program banks if necessary.
- Select desired scene within the bank by pushing the corresponding SCENES button (Front Panel: item 15).
- Select the fixture(s) to be affected by pushing the associated SCANNERS buttons (Front Panel: item 16).
- Adjust the appropriate faders to set the desired output level for each channel (Front Panel: item 1).
- Push MIDI/ADD button (Front Panel: item 12) to prepare to save.
- Push the SCENES button (Front Panel: item 15) used in step 2 to store the edited scene. When storing is complete, the display will flash briefly.
- De-select any fixtures you have used during editing and exit PROGRAM mode.
Check a Scene
- Select desired scene within the bank by pushing the corresponding SCENES button (Front Panel: item 15).
- Press the SCENE button to review each scene individually.
Insert a Scene
- Select desired CHASE button, 1 - 6.
- Press the TAPSYNC/DISPLAY button (Front Panel: item 8) to switch the LED display to steps view.
- Use BANK UP/BANK DOWN buttons (Front Panel: item 14) to navigate steps and locate the insert point of the new scene. The display will read the step number.
- Press MIDI/ADD button (Front Panel: item 12) to prepare the insert.
- Use the BANK UP/BANK DOWN buttons (Front Panel: item 14) to locate the scene.
- Press the SCENE button that corresponds to the scene to be inserted.
- Press MIDI/ADD button (Front Panel: item 12) to insert the scene. All LEDs on the controller will blink.
Copy a Scene
You can copy the contents of a scene to another scene in the same or different bank.
- Use BANK UP/BANK DOWN buttons (Front Panel: item 14) to select the bank from which you wish to copy a scene.
- Select desired scene within the bank by pushing it's SCENES button (Front Panel: item 15).
- Push MIDI/ADD (Front Panel: item 12) to copy the scene.
- Select the bank which you want to copy to using BANK UP/BANK DOWN buttons (Front Panel: item 14).
- Push the SCENES button to complete the operation. All LEDs on the controller will flash briefly indicating the operation has been completed.
Copy a Bank of Scenes
Copy the entire contents of a scene bank to another bank.
- Select the bank from which you wish to copy by using BANK UP/BANK DOWN buttons (Front Panel: item 14).
- Push MIDI/ADD (Front Panel: item 12).
- Select the bank to which you wish to copy by using BANK UP/BANK DOWN buttons (Front Panel: item 14).
- Push MUSIC/BANK COPY (Front Panel: item 10) to complete the operation. All LEDs on the controller will flash briefly indicating the operation has been completed.
Copy Fixture Settings
You can copy the settings of a fixture to another while programming a scene.
- Hold down the SCANNERS button (Front Panel: item 16) of the selected fixture.
- Now push the SCANNERS button of the fixture to which the settings will be copied.
- Release the first SCANNER button and then release the second button.
- All SCANNER LED indicators will flash to indicate completion of the copying process.
Delete a Scene
This will set all channels of all fixtures associated with the scene to zero output level.
- Select the bank which contains the scene you want to delete using BANK UP/BANK DOWN buttons (Front Panel: item 14).
- Hold down AUTO/DEL (Front Panel: item 11) and push the SCENES button (Front Panel: item 15) to delete the desired scene. All LEDs will flash briefly indicating that the operation has been completed.
Delete all Scenes in a Bank
- Press and hold the PROGRAM (Front Panel: item 13) and the BANK DOWN (Front Panel: item 14) buttons while turning the power off.
- Turn the controller on. This process is irreversible and all scenes will be set to 0.
Clear all Scenes
This will delete all the scenes in all of the banks.
- Turn the unit off. Now turn the power on while simultaneously holding down the PROGRAM (Front Panel: item 13) and BANK DOWN (Front Panel: item 14) buttons.
- Keep holding down the buttons until the display flashes briefly indicating that the scenes have been cleared.
Operating Scenes and Chases
⚠️These instructions assume that you have already recorded scenes and/or chases on the controller. If not, you'll want to return to the previous two sections; Programming Scenes and Programming Chases.
Operate Scenes
Default Operating Mode: When the ROCKFORCE 384 is turned on, it defaults to manual scene mode with bank 1, scene 1 active.
Manual Mode: This mode allows direct control of all scanners. You are able to move them and change attributes by using the channel faders (Front Panel: item 1). All changes made while in Manual mode are temporary and will not be recorded.
- Press the AUTO/DEL button (Front Panel: item 11) repeatedly until the MANUAL LED is lit.
- Select a SCANNER button (Front Panel: item 16).
- Move the channel faders (Front Panel: item 1) to change fixture attributes.
- Press the TAPSYNC/DISPLAY button (Front Panel: item 8) to toggle the output indicator in the LED display between DMX values (0-255) and percentage (0-100%).
Review Scenes
- Select any one of the 30 banks by pressing the BANK UP/BANK DOWN buttons (Front Panel: item 14).
- Select a SCENE button, 1-8, to review.
- Move wheel and faders (Front Panel: item 1) to change fixture attributes.
Review Chases
- Select any one of the 6 CHASE buttons (Front Panel: item 9).
- Press the TAPSYNC/DISPLAY button (Front Panel: item 8) to view the step number on the display.
- Press the BANK UP/BANK DOWN buttons (Front Panel: item 14) to review all the scenes in a chase.
Run a Bank of Scenes Automatically
The scene Auto-Run function will continuously cycle through a bank of scenes. The operator can control the speed and scene fade time. To adjust the speed use the TAPSYNC button (Front Panel: item 8) or the SPEED fader (Front Panel: item 5). To control the fade time use the FADE TIME fader (Front Panel: item 6). Scenes can also be synchronized to music or MIDI note triggering.
- Select the appropriate scene bank using BANK UP/BANK DOWN buttons (Front Panel: item 14).
- Push AUTO/DEL (Front Panel: item 11). This will cause the scene Auto-Run to begin cycling and the AUTO TRIGGER indicator on the display will light.
- Adjust the speed and fade time as needed. If you set your speed faster than the fade time then the scenes will advance before the fade is complete.
- You can switch to another bank at any time using BANK UP/BANK DOWN buttons (Front Panel: item 14).
- To stop Auto-Run press the AUTO/DEL button (Front Panel: item 11). The AUTO TRIGGER indicator on the display will go OFF.
Run Scenes Automatically with Music Sync
This unit has an internal microphone which can be used to Auto-Run scenes with music synchronization.
Scene Music Auto-Run
- Press MUSIC/BANK COPY (Front Panel: item 10). The MUSIC TRIGGER indicator on the display will light.
- To switch to a different scene bank use BANK UP/BANK DOWN buttons (Front Panel: item 14).
- You can adjust the duration time using the FADE TIME fader (Front Panel: item 6).
- To stop Music Auto-Run press the MUSIC/BANK COPY button (Front Panel: item 10).
Chase Operating Modes
Chases can be run in:
- Manual Mode
- Auto-Run Mode
- Music Auto-Run Mode
Manual Chase Operation
This is used to manually step through a chase. It is done in program mode and is useful when creating or editing chases.
- Press and hold the PROGRAM button (Front Panel: item 13) to enter program mode. The display PROGRAM indicator will continuously flash while in program mode.
- Select a chase, 1-6, by pushing the appropriate CHASE button (Front Panel: item 9).
- Press TAP/SYNC and the display will show the chase and step numbers. The display STEP indicator will light.
- Use the BANK UP/BANK DOWN buttons (Front Panel: item 14) to cycle through the chase steps.
- When finished, press and hold PROGRAM (Front Panel: item 13) for 3 seconds to exit the program mode.
Run a Chase Automatically
The chase Auto-Run function will continuously cycle through a chase. Multiple chases can be run together and in the order selected.
- Select a chase, 1-6, by pressing the appropriate CHASE button (Front Panel: item 9). You can select more than one.
- Push AUTO/DEL (Front Panel: item 11). The AUTO TRIGGER indicator in the display will light and the chase(s) will run.
- Adjust the chase speed by tapping the TAPSYNC/DISPLAY button (Front Panel: item 8) twice at a specific rate. The time between the two taps will determine the chase speed. The maximum time is 10 minutes.
- To stop chase Auto-Run press the AUTO/DEL button (Front Panel: item 11). The AUTO TRIGGER indicator on the display will go OFF. If all the chases are turned off before you turn off Auto-Run, the unit will default to the scene Auto-Run in the last accessed scene bank.
Chase Music Auto-Run
- Press MUSIC/BANK COPY (Front Panel: item 10). The MUSIC TRIGGER LED on the display will light.
- Select a chase, 1-6, by pressing the appropriate CHASE button (Front Panel: item 9).
- You can select several CHASE buttons in sequence and all selected chases will loop in the order in which they were selected.
- You can adjust the duration time using the FADE TIME fader (Front Panel: item 6).
- To stop Music Auto-Run press the AUTO/DEL button(Front Panel: item 11). The MUSIC TRIGGER indicator on the display will go OFF.
MIDI Control Activation
The controller will only respond to MIDI commands on the MIDI channel which is set to full stop. The ROCKFORCE 384 uses MIDI "Note on" commands to execute scene and chase function. All other MIDI instructions are ignored. You may have to use a MIDI keyboard to send the correct notes. To stop a chase, send the blackout on note.
- Press and hold the MIDI/ADD button (Front Panel: item 12) for about to 3 seconds.
- Select MIDI control channel, 1-16, via the BANK UP/BANK DOWN buttons (Front Panel: item 14) to set.
- Press and hold the MIDI/ADD button (Front Panel: item 12) to save settings.
- To release MIDI control, press any other button except the BANK UP/BANK DOWN buttons during step 2.
The table below shows the functions which can be controlled by MIDI:
MIDI NOTE | FUNCTION |
00-07 | Bank 1 Scenes 1-8 ON/OFF |
08-15 | Bank 2 Scenes 1-8 ON/OFF |
16-23 | Bank 3 Scenes 1-8 ON/OFF |
24-31 | Bank 4 Scenes 1-8 ON/OFF |
32-39 | Bank 5 Scenes 1-8 ON/OFF |
40-47 | Bank 6 Scenes 1-8 ON/OFF |
48-55 | Bank 7 Scenes 1-8 ON/OFF |
56-63 | Bank 8 Scenes 1-8 ON/OFF |
64-71 | Bank 9 Scenes 1-8 ON/OFF |
72-79 | Bank 10 Scenes 1-8 ON/OFF |
80-87 | Bank 11 Scenes 1-8 ON/OFF |
88-95 | Bank 12 Scenes 1-8 ON/OFF |
96-103 | Bank 13 Scenes 1-8 ON/OFF |
104-111 | Bank 14 Scenes 1-8 ON/OFF |
112-119 | Bank 15 Scenes 1-8 ON/OFF |
120-125 | Chases 1-6 ON/OFF |
126 | Blackout |
DMX Connections
When using multiple DMX devices, they should be connected together as a chain of devices. The devices should be wired in a daisy chain fashion, meaning the control cable will go from the controller to the first fixture and then to other fixtures. Most fixtures have a DMX IN and a DMX OUT port for this purpose. Do not split the control cable into a multiple run star arrangement with a cable running from the controller directly to each fixture.
DMX Output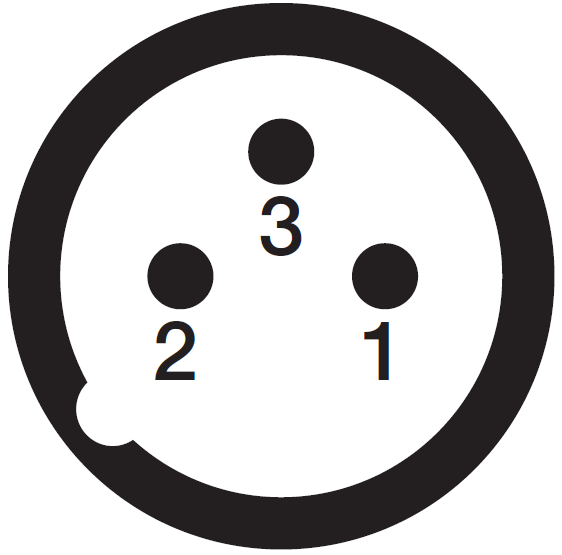
XLR Mounting Socket:
- Ground
- Signal (-)
- Signal (+)
DMX Input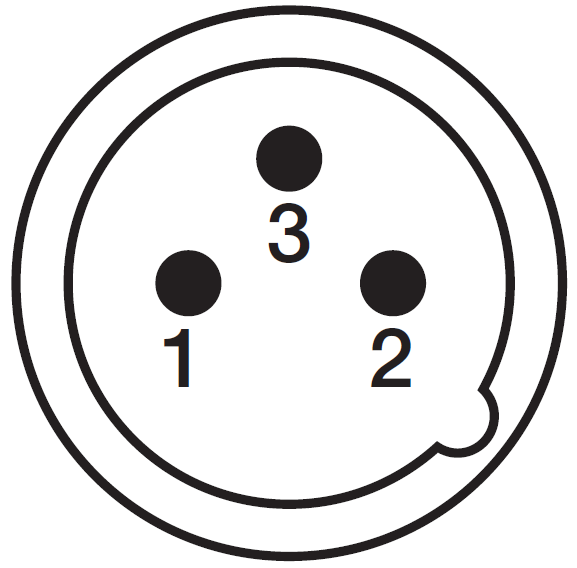
XLR Mounting Plug:
- Ground
- Signal (-)
- Signal (+)
DMX Connector Pin Assignments
There are two types of DMX cables, 3-pin or 5-pin, and they feature XLR type connectors. This unit transmits from a 3-pin female connector on the back edge of the unit. If your fixtures use 5 pin connectors, we recommend you acquire a 3-pin male XLR to 5-pin female XLR adapter. Some fixtures use a reversed signal scheme. This means the DATA - and DATA + pins are reversed. This unit features a reversing switch on the back so as to accommodate those types of fixtures. The table below shows the pin assignments for both normal and reversed operation:
PIN | NORMAL | REVERSED |
1 | DMX Common | DMX Common |
2 | DMX DATA - | DMX DATA + |
3 | DMX DATA + | DMX DATA - |
4 | Not used | Not used |
5 | Not used | Not used |
DMX Termination
If you are only connecting a few fixtures which are close together and use a short run to the controller, you maybe able to operate without a terminator.
There are two types of DMX cables, 3-pin or 5-pin, and they feature XLR type connectors. This unit transmits from a 3-pin female connector on the back edge of the unit. If your fixtures use 5 pin connectors, we recommend you acquire a 3-pin male XLR to 5-pin female XLR adapter. Some fixtures use a reversed signal scheme. This means the DATA - and DATA + pins are reversed. This unit features a reversing switch on the back so as to accommodate those types of fixtures. The table below shows the pin assignments for both normal and reversed operation:
PIN | NORMAL | REVERSED |
1 | DMX Common | DMX Common |
2 | DMX DATA - | DMX DATA + |
3 | DMX DATA + | DMX DATA - |
4 | Not used | Not used |
5 | Not used | Not used |
In controller mode, the last fixture of a DMX chain has to be "terminated". This prevents electrical noise from disturbing and corrupting the DMX control signals. To terminate the last fixture solder a 1/4 Watt, 120 Ohm resistor across the DATA - and DATA + wires.[cite: 16, 17] The connections are illustrated below. If you are only connecting a few fixtures which are close together and use a short run to the controller, you maybe able to operate without a terminator.
DMX Termination Diagram:
If you wish to connect DMX controllers with other XLR outputs, you need to use an adapter cable.
Features and Specifications
- Rockville ROCKFORCE 384 Universal DMX-512 controller with MIDI controls
- 24 Intelligent lights of up to 16 channels each
- 30 Banks of 8 programmable scenes
- 384 DMX channels of control
- 6 Programmable chases of 240 scenes
- Record up to 6 chases with fade time and speeds
- 16 Sliders for direct control of channels
- MIDI control over banks, chases and blackout
- Built-in microphone for music mode
- Automatic mode program controlled by speed and fade time sliders
- Blackout master button
- Reversible DMX channels allows fixture to react opposite to others in a chase
- Manual override allows you to grab any fixture on the fly
- Built-in microphone for music triggering
- MIDI control over banks, chases, and blackout
- DMX polarity selector
- Power failure memory
- 4 bit LED display
- DMX in/out: 3 pin XLR
- LED goose neck lamp
- Power Supply: 110-240V, 50/60Hz (DC 9V-12V)
- Electric current: > 500mA
- Power Consumption: 10W
- Control Signal: DMX512
- Control Channels: 384CH
- Item weight: 5.4 lbs.
- Product dimensions: 20.71” x 7.28” x 3.15”
Glossary of Common Terms
- Blackout: a state where all lighting fixture's light output is set to 0 or off, usually on a temporary basis.
- DMX-512: an industry standard digital communication protocol used in entertainment lighting equipment.
- FIXTURES: refers to your lighting instrument or other device such as a fog machine or dimmer which you can control.
- Programs: are numerous scenes stacked one after another. It can be programmed as either a single scene or multiple scenes in sequence.
- Scenes: are static lighting states.
- Sliders: also known as faders.
- Chases: can also be called programs. A chase consists of numerous scenes stacked one after another.
- Scanner: refers to a lighting instrument with a pan and tilt mirror; however, in the ILLS-CON controller it can be used to control any DMX-512 compatible device as a generic fixture.
- MIDI: is a standard for representing musical information in a digital format. An MIDI input would provide external triggering of scenes using an MIDI device such as a MIDI keyboard.
- Stand Alone: refers to a fixture's ability to function independently of an external controller and usually in sync to music, due to a built-in microphone.
- Fade: a slider used to adjust the time between scenes within a chase.
- Speed: a slider that affects the amount of time a scene will hold its state. It is also known as a "wait time".
- Shutter: a mechanical device in the lighting fixture that allows you to block the lights path. It is often used to lessen the intensity of the light output and to strobe.
- Patching: refers to the process of assigning fixtures a DMX channel.
- Playbacks: can be either scenes or chases that are directly called to execution by the user. A playback can also be considered program memory that can be recalled during a show.
Comments
0 comments
Please sign in to leave a comment.