
Rockville RDM18 V2
In-Dash Car Digital Media Bluetooth AM/FM/MP3 USB/Micro SD Receiver
Receiver Controls
- Power On-Off / Mute
- Previous / Next
- Volume / Select Knob
- IR Receiver
- LCD display
- USB Input Port
- USB Charging Port
- Aux-In Port
- Micro SD Card Slot
- Preset 6 / Skip Ahead 10 (Lists and Menus in Micro SD/USB Mode)
- Preset 5 / Go Back 10 (Lists and Menus in Micro SD/USB Mode)
- Preset 4 / Random Play
- Preset 3 / Repeat
- Preset 2 / Track Intro
- Preset 1 / Play & Pause
- Mode / End Call
- Microphone
- Automatic Music Search
- Reset Button
- Band Select / Answer Call
Receiver Functions
Power ON-OFF/Mute Button: Press quickly to turn the unit on. Press and hold for 2 seconds to turn the unit off. Press to mute when the unit is on.
|◀◀ / ▶▶| Buttons: In Bluetooth and USB/Micro SD modes, press to return to a previous track or skip to the next track. In USB/Micro SD only, press and hold to rewind or fast forward. In radio mode press and hold to enter manual search mode, then use the prev and next buttons to go through the stations in increments of .05. Once you find a station you like, hold down any of the preset buttons to save it to that slot. For example, if you want to save the station to preset 3, simply press the preset 3 button.
Volume/Select Knob: Rotating the knob clockwise will increase the volume. Turning it counter clockwise will reduce the volume. Press the knob then rotate it to scroll through functions.[cite: 3, 4] Press down to select the desired function. Pressing down on the button will also allow you to adjust BASS, TREBLE, BALANCE (adjusts left and right level), FADER (adjusts front and rear levels), LOUDNESS (for listening at low volumes while maintaining a balanced sound), LED colors (blue, green, cyan, red, purple, yellow, white), EQ settings, and DX/Local & mono/stereo (am/fm only; see below).
DX/Local (AM/FM only): Setting the radio to DX will allow you to pick up distant radio signals that maybe too weak to pick up if your unit is set to Local. This setting works well when you are in a remote area far from radio transmitters or inside of a building where radio reception is weak. The Local setting allows you to hear nearby radio stations clearly and blocks out any interference that may be caused by distant radio stations. It also limits the number of stations tuned to local ones when using the AMS feature.
Stereo/Mono (AM/FM only): Stereo refers to when two separate sound signals are split between two channels so you get left/right sound imaging. It's best when used while listening to FM radio stations. Mono refers to when a single signal is sent to all speakers. It is best when used while listening to AM stations, from a mono signal source, or to improve poor FM reception.
Display Screen: The LCD screen will display relevant information about the current function.
USB Port: Connect USB flash drive and use the MODE button to cycle to USB mode. Audio playback will begin automatically. Supported file formats: MP3/WMA.
USB Charging Port: Delivers 5V/0.5mA to charge your phone, MP3 player, etc.
Auxiliary In Port: Switch to AUX input via the mode button. Connect your external device (phone/MP3 player) via a 3.5mm to 3.5mm cable (not included). Volume is controlled via your device and the unit's volume knob. Please note, the volume controls work independently of each other.
Micro SD Card Slot: Insert Micro SD card into slot and use the MODE button to cycle to Micro SD mode. Audio playback will begin automatically. Supported file formats: MP3/WMA.
Mode Button: Press to cycle through playback modes in the following order: RADIO, USB, Micro SD, AUX, BLUETOOTH. In Bluetooth mode, press to end a call or reject an incoming call.
AMS (Automatic Music Search) Button: In radio mode press to seek radio stations automatically. Press and hold to save desired station. In USB/SD mode, pressing this button will activate track search mode. Now you can search for music by track number. There will be three numeric fields. Use the Volume/Select Knob to cycle through the three numerical values. Upon turning the knob left or right, you will be able to adjust the first numeric field. Once it is set, the number will flash for a few seconds then lock in. When the next numeric field begins to flash, follow the procedure above to set it and the third field as well. Once you've set all the fields, press the Volume/Select Knob to confirm your selection.
Band Button: In Radio mode press to cycle through bands in the following order: FM1, FM2, FM3, AM1, AM2. In Bluetooth mode press to answer calls. In USB and Micro SD modes press to display track title and the folder in which it is located. Press twice to see the folder and once for the track title.
1/▶|| Button: In radio mode press to go to preset 1. In Bluetooth and USB/Micro SD modes, press to play/pause music.
2/Int (track intro) Button: In radio mode press to go to preset 2. In USB/Micro SD mode press to play a 10 second snippet of each track. This allows you to preview songs until you find one you like. Press again to stop the intro function and listen to full track. When in intro mode, INT will be displayed on the screen.
3/Repeat Button: In radio mode press to go to preset 3. In USB/Micro SD mode pressing this key will repeat the current track continuously; the screen will display RPT ONE. Press the button again to repeat all songs in the current folder; the screen will display RPT DIR. Press the button again to exit repeat mode; the screen will display RPT ALL.
4/Random Button: In radio mode press to go to preset 4. In USB/Micro SD mode press this button to activate random playback mode. While in random mode it will play different songs at random and in any order. Pressing the back or next buttons randomizes it too. Press again to deactivate random mode. While in random mode RDM will be displayed on the screen.
5/-10 Button: In radio mode press to go to preset 5. In USB/Micro SD mode press and hold to go to the next folder.
6/+10 Button: In radio mode press to go to preset 6. In USB/Micro SD mode press and hold to go to the previous folder.
Reset Button: Press this button to restore the unit to factory settings.
Remote Control Functions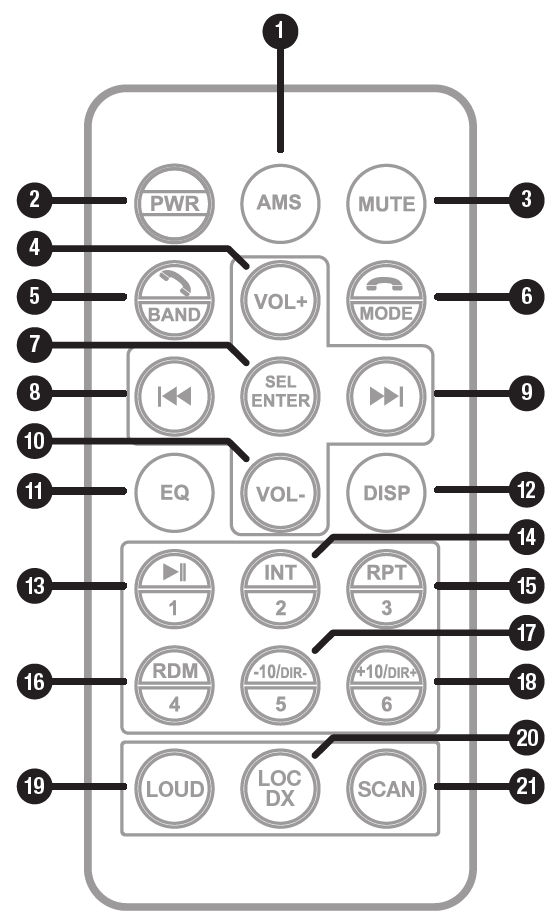
- AMS (Automatic Music Search)
- Power
- Mute
- Increase Volume
- Answer Call / Band
- End Call / Mode
- Select/Enter (Access functions Menu)
- Previous Track / Browse Radio Stations
- Next Track / Browse Radio Stations
- Decrease Volume
- EQ Control
- Display / Set Clock
- Play & Pause / Preset 1
- Track Intro / Preset 2
- Repeat / Preset 3
- Random / Preset 4
- Select Previous Folder / Preset 5
- Select Next Folder / Preset 6
- Loudness On/Off
- DX/Local
- Scan Radio Stations
Bluetooth Pairing
- Ensure that Bluetooth is enabled on your device.
- In the list of available Bluetooth connections, select "RDM18 V2".
- Your device should connect automatically.
- Some devices may require a password. If prompted, the password is 0000
- Please note, only one phone can be paired to the unit at once. To pair another phone, disconnect the first paired device.
Bluetooth Playback & Hands-free Functions
- You can control playback as well as answer, end, and reject calls via the head unit. Refer to the RECEIVER FUNCTIONS section for more information.
- During audio playback, the LCD screen will show A2DP. Otherwise, it will show PHONE.
USB/Micro SD
- Connect a USB drive to the USB port labeled USB or insert a Micro SD card into the slot labeled TF. Use the MODE button to select the proper playback mode. Once you've selected the proper mode, playback will begin automatically.
- Refer to the RECEIVER FUNCTIONS section for information concerning playback controls.
- Accepts Micro SD cards and USB drives with a capacity of up to 32GB.
- Supports WMA and MP3 audio files only.
Setting The Clock
- Press the DISP button on the remote. The LCD screen will briefly display the time.
- While the time is displayed, press and hold the DISP button to enter the time settings menu.
- Turn the Volume/Select knob (forward or back) to adjust the hour. Once set, press the knob and the minute digits should start flashing. Turn the Volume/Select knob (forward or back) to adjust the minutes.
- When the correct time is set, press and hold the DISP button to save changes and exit the clock settings menu.
Installation
- Carefully remove the unit from the box. Keep the box for warranty and service purposes.
- Choose the mounting location carefully so that the unit will not interfere with normal driving functions.
- Avoid installing the unit where it will be subject to high temperatures from direct sunlight, heater vents; or where it would be subject to dust, dirt, or excessive vibration.
- If you have to do any modifications to the car body, such as drilling holes, consult your vehicle manual before doing so.
- To ensure a safe and secure installation we recommend you only use the included mounting hardware.
- Insert the universal mounting sleeve into the instrument panel.
- Use a screwdriver to bend mounting sleeve stoppers if necessary.
- Insert the head unit into the universal mounting sleeve until it locks.
- Securely fasten the trim plate.
⚠️ It is recommended that you contact a professional to install the unit if you feel unsure or incapable of doing it yourself.
Wiring Diagram
Features
- Single DIN AM/FM Receiver
- Super Bright LCD Display
- Micro SD Card Reader, Supports Double High Speed Micro SDHC (32GB) Card
- USB 2.0 Input
- USB Charging Port (5V/0.5mA)
- Front 3.5mm AUX input
- Electronic PLL Tuning Control
- FM/AM Receiver w/18 FM and 12 AM Preset Station Capability
- Auto Memory Store/Preset Scan
- Automatic Music Search
- Repeat/Random/Intro Play Functions
- Preset and Custom EQ (Pop/Rock/Classic)
- Mute/Loudness/Clock Function
- Power Output: 4 x 17W RMS / 4 x 50W Peak
- 4-Channel RCA Pre-Amp Output
- Bluetooth Capability for Hands-Free Calling and Streaming Music
- Built-in High Sensitivity BT Microphone
- Full-Function Remote Control Included
Maintenance
- Fuse Replacement: If the fuse blows, check the power connection and replace the fuse. If the fuse blows again, there may be an internal malfunction.
Comments
0 comments
Please sign in to leave a comment.