
Thank you for purchasing this Rockville BPA10 10˝ Active DJ/PA Speaker with Bluetooth.Please read this owner's manual carefully for proper use of your BPA10 speaker. Should you need assistance, please call our technical help line at 1-646-758-0144, 24 hours a day/7 days a week.
IMPORTANT SAFETY INSTRUCTIONS
- To reduce risk of electric shock, never open the unit. There are no user serviceable parts; refer service to the Rockville service center.
- Do not expose this unit to any kind of moisture.
- Please ensure that the unit is situated in a properly ventilated area.
- Make sure the unit is placed on a level and stable surface.
- This unit can operate with either 110V or 220V.
Setting Up Your BPA Sound System
Your BPA Series speaker is designed to deliver full-range sound through its integrated woofer and high-frequency tweeter horn. Low frequencies produced by the woofer naturally travel along the floor and walls of the room. Because of this, precise woofer aiming is less critical, as low-frequency sound waves can propagate effectively even when partially obstructed. High frequencies produced by the tweeter horn are more directional. For optimal performance:
- Ensure the tweeter horn is not blocked by furniture, walls, or other obstacles.
- Position the speaker so the tweeter is aimed at ear level of the listening audience.
For best results, it is recommended to mount the speakers on stands, such as the Rockville RVSS-2 (sold separately). Elevating the speakers allows the high-frequency sound to project above the crowd, ensuring optimal sound dispersion and clear vocal reproduction.
How To Avoid Irritating Feedback
Proper microphone placement is essential to prevent feedback when using your BPA Series speaker. Never position the microphone in front of the speaker, always place it behind the speaker.
When making adjustments to the speaker or microphone settings, approach the unit from the rear, not from the front. Walking directly in front of the speaker while the microphone is active may cause feedback.
Setting Level Controls
It is best practice to set your input volume (gains) in this manner:
- In this instance we are using the LINE INPUT RCA jacks.
- Set the line-level input device volume (mixer, smart phone, tablet, MP3 player, etc.) to 60%.
- Slowly turn up the corresponding AUX INPUT/LINE INPUT volume knob (Volume 2). As soon as the clip indicator LED goes on or you hear any distortion – turn it down one or two notches.
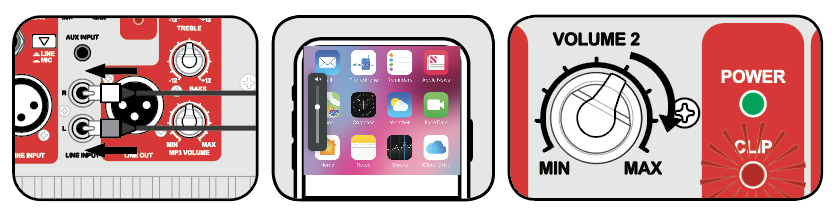
Please Note
When adjusting the MIC/LINE INPUT volume knob, you must speak into the microphone and adjust the control as needed. This is because adjustments to the mic input are a matter of mic volume in relation to the music volume and not necessarily a clipping issue.
Microphone/Line Input
Your BPA features balanced microphone and line input via an XLR input or ¼˝ TRS input.
- When using these inputs make sure the LINE/MIC switch is set to MIC.
- NEVER USE BOTH PORTS AT ONCE.
- To reduce the risk of feedback and distortion, always stand behind the BPA when
- Adjusting microphone levels.
Line Input
The RCA and 3.5mm AUX inputs allow you to connect an additional stereo audio source.
- These inputs are compatible with devices such as smartphones, tablets, MP3 players, CD players, mixers, and other line-level audio sources.
- ONLY USE ONE INPUT AT A TIME.
Line Out XLR
The XLR jack labeled LINE OUT provides a mixed output signal from the unit. This output can be used to send the combined audio signal to an additional powered speaker, amplifier, or mixer.
USB/SD Input
To play audio from a USB flash drive or SD card, insert the device into the appropriate port. Playback will begin automatically.
- When a USB flash drive or SD card is inserted, it will automatically override all other input modes. If you switch to another input mode and wish to return to USB/SD playback, press the MODE button until the USB/SD LED indicator is illuminated.
- Adjust USB/SD playback volume using the MP3 VOLUME control knob.
FM Radio
- Press the MODE button until the LCD display shows frequency digits.
- Press and hold the
button to scan for and save available FM stations.
- Use the
and
buttons to select stations.
- Use the MP3 VOLUME knob to adjust FM radio volume.
Bluetooth Pairing
To connect your iPhone, MP3 player, Android phone, or any other bluetooth-enabled device, follow the steps below:
- Enable the bluetooth function on your device and make sure it is set to "discoverable" mode.
- Power ON the BPA and press the MODE button until the LCD display will shows “bt” flashing intermittently, indicating the unit is ready to pair.
- On your device, locate “BPA10” in the list of available bluetooth devices and select it. Upon successful pairing, “bt” on the LCD display will stop flashing and remain solid, indicating an active connection.
- Playback can be controlled from your device or the MP3 interface. Use your bluetooth device's volume control and the MP3 volume knob to adjust volume. Please note, these controls work independently of each other.
Pole/Stand Mounting
To mount the speaker, simply loosen the lock knob on the pole mount located at the back of the unit near the bottom (fig. a). Carefully lift the speaker and place it onto the stand or flypole (fig. b). Now tighten the the lock knob on the pole mount (fig. c).
Rigging
The BPA is equipped with one integrated M8 attachment point, designed for secure rigging of the speaker in permanent installations. To begin, identify the attachment point (see fig. a) and carefully remove the protective plastic cap to reveal the M8 threaded inlet.
Attach rigging hardware that is appropriately rated for the speaker’s weight and application. Before lifting or suspending the speaker, double-check all hardware connection points to ensure they are fully secure. Attach secondary safety wire as a redundant fail-safe in the event of primary suspension failure
WARNING: Rigging loudspeakers for a flown arrangement presents a risk of severe injury or death if not done properly. Rockville assumes no responsibility for improper installations and/or use of non-certified rigging equipment. For further assistance or professional recommendations, contact an authorized installer or reach out to our support team.
Remote Control
The remote control can be used with Bluetooth, USB, and SD modes ONLY. When operating the remote, aim it directly at the center of the speaker.
|
- USB input
- LED screen
- SD input
- Mode control button: Push and hold to power unit ON/OFF. Push to switch between modes (USB/SD/BT/FM)
- MP3 Controls:
- Play/Pause
- Repeat
- Rewind: In USB/SD/BT mode press for previous track, press and hold to rewind. In FM mode press for previous station.
- Fast Forward: In USB/SD/BT mode press for next track, press and hold to fast forward. In FM mode press for next station.
- Volume 1: Mic/Line Input volume control
- Volume 2: Line Input/Auxiliary Input volume control
- 1/4˝ Balanced TRS Mic/Line input
- Line/Mic selector switch (applies to XLR and 1/4˝ inputs)
- 3.5mm auxiliary input (controlled via Volume 2)
- Balanced XLR Mic/Line input
- RCA line input (controlled via Volume 2)
- Power/Clip LED indicators
- Treble control, -12dB to +12dB
- Bass control, -12dB to +12dB
- MP3 volume control (applies to USB, SD, BT, and FM input)
- Balanced XLR line out
- Power switch
- IEC AC power socket
- User serviceable fuse compartment. Fuse rating: 250V/3.15A
Specifications
- 100 Watts RMS/200 Watts Program Power/400 Watts Peak
- Frequency Response: 20Hz – 20kHz
- Maximum SPL @1w/1m: 102dB peak/100dB continuous
Features
- Bluetooth range: 32 feet
- USB/SD digital MP3 music player. Accepted formats: MP3, WMA, WAV
- Wireless remote control (controls Bluetooth, USB, and SD modes only)
- Built-in LED screen
- High-power 2-way pro sound reinforcement speaker system for live sound and play back applications.
- Compact and light-weight system delivers distortion-free sound even at extreme SPL.
- Linear Class AB amplifier technology ensures high-power, transparent sonic performance.
- Internal switch-mode power supply for low-distortion audio with superior transient response.
- Built-in bass and treble equalization processor for ultimate system control and speaker protection.
- High-power long-throw 10˝ woofer with 1.5˝ KSV voice coil provides incredibly deep bass and acoustic power.
- State-of-the-art 1˝ pure titanium-diaphragm compression drive for crystal-clear, high-frequency reproduction.
- Ultra-wide dispersion, 45° large-format horizontal wave guide horn molded directly into cabinet.
- Built-in high-quality crossover to filter out unwanted frequencies.
- Ultra-low-noise Mic/Line input via XLR & ¼˝ TRS jacks with volume control.
- Line RCA, XLR, and 3.5mm input with independent volume control.
- Additional XLR line output to connect multiple speakers or a mixer.
- Stand mounting with 35mm pole socket.
- M8 Fly Point
- High-quality components and exceptionally rugged high-impact ABS construction.
- Amplifier clip limit & power LED indicators
- Built-in FM radio with 10 presets and US/European tuning.
- 110/220 Volt switchable with external user serviceable fusing.
- Fuse rating: 250V/3.15A
- Item actual dimensions: 12.41˝ (L) x 11.5˝ (W) x 19.31˝ (H)
- Item actual weight: 18.48 LB
Troubleshooting
PROBLEM | SOLUTION |
| No power |
|
| No sound/distorted sound |
|
| Buzzing sound | Make sure you are using a proper cable. For ¼˝ cables, there are 3 types: instrument, TS (unbalanced), and TRS (balanced). Check the requirements of the connected gear and the input of the speaker and make sure you are using the appropriate cable. |
| Mic feedback | Point the mics away from the speaker. Make sure the mics are behind the speaker, not in front of it. |
| Poor Mic sound |
|
| Bluetooth pairing fails |
|
| No SD or USB playback |
|
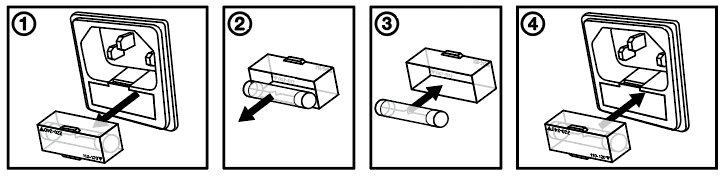
Replacing the Fuse
The BPA10 uses an 250V/3.15A fuse. Be sure to replace with the same type of fuse.
Switching Voltage
FEDERAL COMMUNICATIONS COMMISSION COMPLIANCE INFORMATION
Responsible party name: Rockville
Address: 600 Bayview Ave. Entrance A, Inwood, NY 11096
Hereby declares that the product(s) BPA10 10˝ pro audio speakers comply with FCC rules as mentioned in the following paragraph:
This device complies with Part 15 of the FCC rules. Operation is subject to the following two conditions: (1) this device may not cause harmful interference, and (2) this device must accept any interference received, including interference that may cause undesired operation.
Note: This equipment has been tested and found to comply with the limits for a Class B digital device, pursuant to Part 15 of the FCC rules. These limits are designed to provide reasonable protection against harmful interference in a residential installation. This equipment generates, uses, and can radiate radio frequency energy and, if not installed and used in accordance with the instructions, may cause harmful interference to radio communications. However, there is no guarantee that interference will not occur in a particular installation. If this equipment does cause harmful interference to radio or television reception, which can be determined by turning the equipment off and on, the user is encouraged to try to correct the interference by one or more of the following measures:
- Reorient or relocate the receiving antenna.
- Increase the separation between the equipment and receiver.
- Connect the equipment to an outlet on a circuit different from that to which the receiver is connected.
- Consult the dealer or an experienced radio/TV technician for help.
Comments
0 comments
Please sign in to leave a comment.